


Mastering Cal.com's Team Dashboard & Settings: An Overview
Calendar scheduling that makes a difference
Today we're going to explore Cal.com's team dashboard and settings. This is a set of impactful tools and features that work together to enable organizations as well as individuals, so they can maximize the efficiency, reach, and synergy of their Cal.com scheduling infrastructure. To access the team settings page, you have to be logged into your Cal.com account and be an authorized administrator.
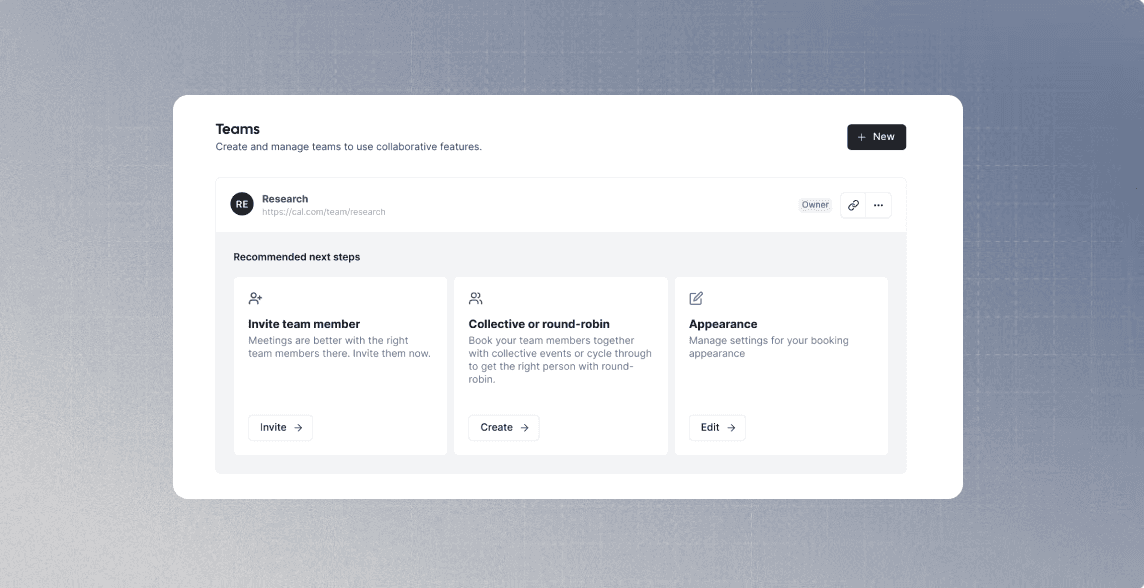
Once this is completed, you'll be able to fully access the Teams tab, which is located on the left-hand side of your dashboard right below Availability. When viewing the team dashboard, you'll be able to see the currently established teams as well as add new ones. If you want to create a new team, all you have to do is click the [+new] button in the upper right-hand corner. From here, you can specify a team name, a team logo, as well as the members that make up the team.
Navigating the team dashboard
The dashboard lets you:
See existing teams.
Initiate new teams by clicking the "New" button at the top right. Specify the team's name, logo, and members.
Edit existing teams.
Preview the team's booking page.
Invite new members or dissolve a team.
If you've only just set up your first team, you'll notice that the recommended next steps are to invite team members, create an event, and customize the appearance. We're going to take some time in this article to cover all of those options and look at how they can be leveraged to benefit your organization's workflow.
Adding new team members

Clicking on the "Invite" button will take you to the “Members” area of your account's team settings. Once here, you'll notice a button that says "[+ Add]" in the upper right-hand corner of the page. Simply click on this button in order to add new team members. You'll notice, once you've done this, that a pop-up window is generated.
This window provides you with the option of inviting team members on an individual basis by inputting their email or Cal.com username, if they already have an account. When you invite members using this method, you'll also be able to specify via the dropdown menu whether the individual is going to be added as a regular member, an administrator, or an owner. This is a quick and efficient method if you're working in a small team with just a couple of members.
However, if you're part of a large organization that has many different teams with a wide variety of members, you might want to use the bulk import feature. This can be accessed by simply clicking on the Bulk Import tab. Once this is done, you'll notice that you have two options for sending bulk invitations.
The first option lets you paste or type the email addresses of the relevant parties in the "Invite via Email" field. When doing this, it's important to ensure that each email address is separated by a comma. The second option lets you upload a CSV file with all of the intended invitees' contact info.
After this is done, you can use a dropdown menu identical to the one that was found under the individual invite tab in order to specify whether all of the bulk invites you’ve just set up are for regular members, administrators, or owners.
Other member settings
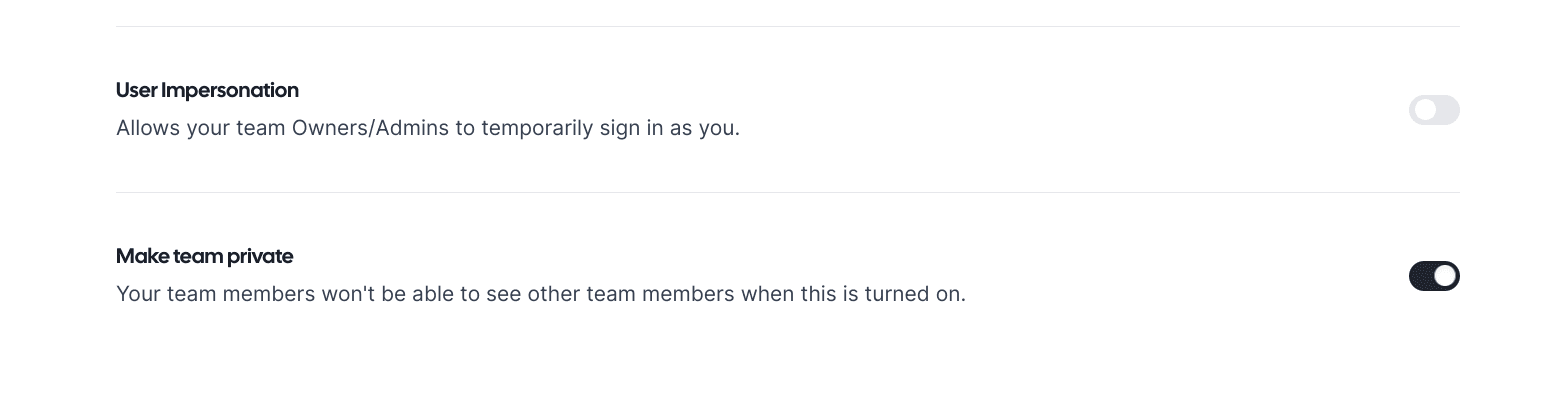
The Members area of your Cal.com team settings also lets you set other parameters like user impersonation and privacy. The user impersonation setting can be enabled to allow team owners and admins to temporarily sign in as other members. This is great for troubleshooting account-level issues as well as customizing new employees' accounts prior to onboarding. Right below the user impersonation setting is where you can find your privacy option. Enabling the "Make Team Private" feature means that team members won't be able to see who else is part of the same team. This is useful in situations where security is paramount and information is only provided on a need-to-know basis.
Unique event types for teams
If we go back to your Cal.com team dashboard, you'll notice that there's an option to create special team-only event types. You can choose to create managed, collective, or round-robin events. Clicking on the designated "Create" button will open a pop-up window that allows you to name the new event, choose from one of three options, and then further customize it. Our collective events are used for meetings with multiple mandatory team members. Round-robin events, on the other hand, are used for meetings that are cycled between team members according to availability. Feel free to check out our user documentation if you want to learn a little bit more about these different event types and the benefits of using them.
Managing booking page appearance
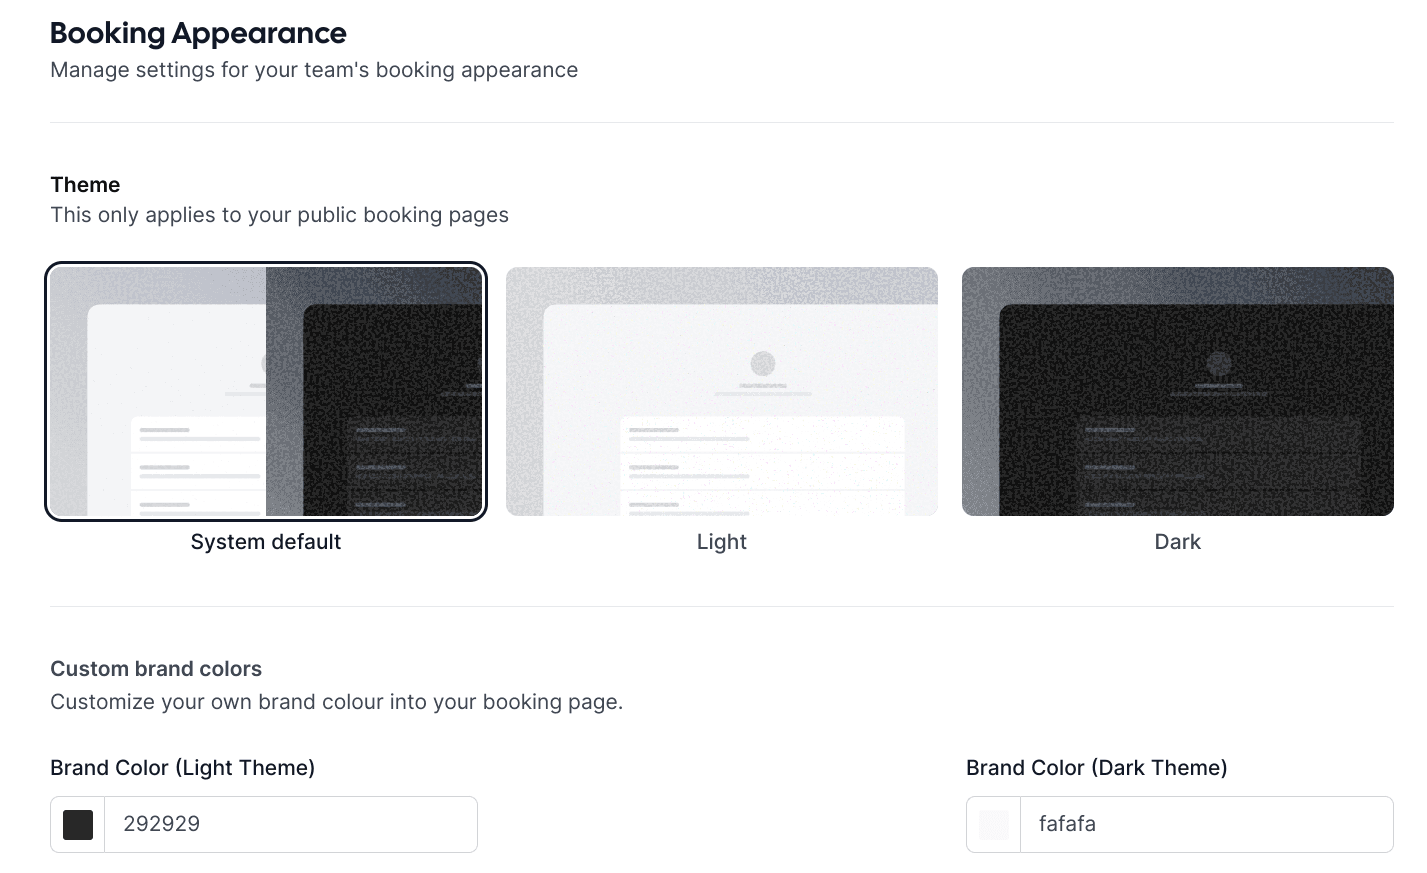
If you click the "Edit" button on the Appearance area of your team's dashboard, you'll be redirected to the appearance section of your team settings page. From here, you'll be able to choose the theme that’s applied to your team’s booking pages. The theme options range from system default to light and dark. In addition, you can customize your team's brand colors, choose to disable Cal.com branding, and also hide the "Book a Team Member" button from your public pages. Once you've made your desired changes, it's essential that you click the "Update" button in the bottom left-hand corner to apply them. If you don't see the changes reflected right away after doing this, just try logging out of your account and then back in.
Other team settings
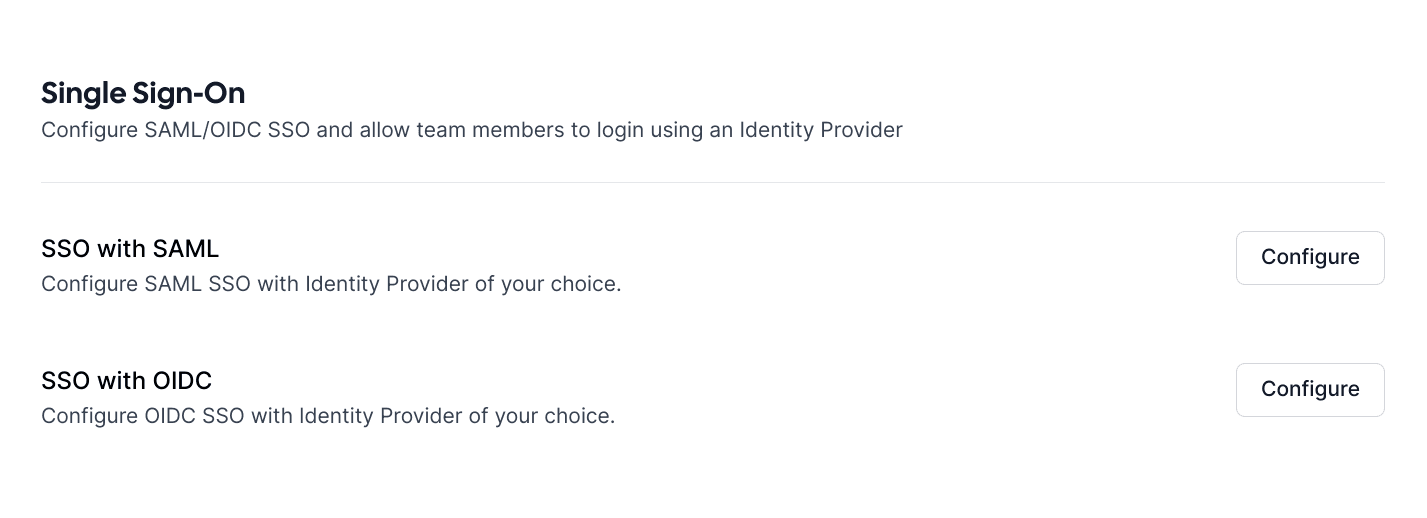
There are two other areas that you'll find in your Cal.com team settings area. The first is called “Billing" and it's where you can view and manage your billing details. After you select this tab, you'll notice a button that you can click on, which will redirect you to the billing portal. Once you're in the billing portal, you'll be able to make changes such as updating or adding additional methods of payment. The second setting that you'll find is called SAML. This is where you can configure your single sign-on options. This will allow you to make customizations that enable your team members to log into their account using an identity provider. You'll find options within here to configure single sign-on using either SSO with SAML or SSO with OIDC.
Navigating Cal.com's team dashboard and settings can initially appear daunting, but the platform is designed to enhance team coordination, security, and personalization. With a plethora of features ranging from member additions, unique event configurations, appearance customizations, to billing and sign-on configurations, Cal.com offers teams the flexibility they need to streamline scheduling operations.
Having a centralized space to manage all of these features provides an efficient way to control team interactions and user experiences. By utilizing Cal.com’s capabilities, teams can reduce administrative burdens, improve collaboration, and enhance the overall booking experience for both team members and those looking to schedule with them.